天才是长期劳动的结果。 —— 牛顿
从0到1构建电商基础秒杀项目,并且在其基础上打造亿级流量企业级项目
应用SpringBoot完成基础项目搭建 项目的性能优化和秒杀,对能力要求实际上是非常大的。
实际上,最简单的电商只需要三个页面:商品详情/确认开枪、订单确认、支付成功(带有流程推荐)
SpringBoot生态简介 SpringBoot默认配置整合了很多框架,就像Maven整合了所有的jar包。并且SpringBoot设置了一个main方法作为启动应用的入口(这就是Spring+Boot),启动所有项目。
电商秒杀应用内容
商品列表页获取秒杀商品列表
进入商品详情页获取秒杀商品详情
秒杀开始后进入下单确认页,下单并支付成功
基础项目实战内容
使用IDEA+Maven搭建SpringBoot开发环境
集成MyBatis操作数据库
实现秒杀项目
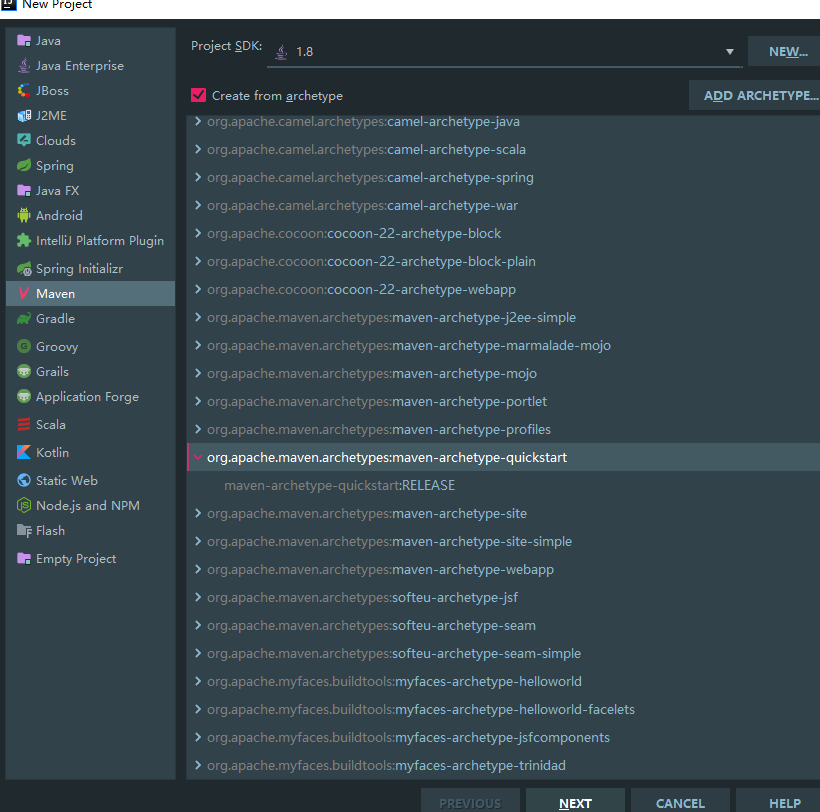
应用SpringBoot完成基础项目搭建 使用IDEA创建Maven项目 使用Maven创建项目,因为有了SpringBoot,所以创建的时候我们选择maven-archetype-quickstart来作为启动模板
然后搭建起来项目,在src下创建一个resources文件用来存储Spring Boot项目的一些文件等等。
引入SpringBoot依赖包实现简单的WEB项目 1 2 3 4 5 6 7 8 9 10 11 12 13 14 15 16 17 18 19 20 21 22 23 24 25 26 27 28 29 30 31 32 33 34 35 36 37 38 39 40 41 42 43 44 45 46 47 48 49 50 51 52 53 54 55 56 57 58 59 60 61 62 63 64 65 66 67 68 69 70 71 72 73 74 75 76 77 78 79 80 81 82 83 84 85 86 87 <?xml version="1.0" encoding="UTF-8"?> <project xmlns ="http://maven.apache.org/POM/4.0.0" xmlns:xsi ="http://www.w3.org/2001/XMLSchema-instance" xsi:schemaLocation ="http://maven.apache.org/POM/4.0.0 http://maven.apache.org/xsd/maven-4.0.0.xsd" > <modelVersion > 4.0.0</modelVersion > <groupId > com.miaoshaproject</groupId > <artifactId > miaosha</artifactId > <version > 1.0-SNAPSHOT</version > <name > miaosha</name > <url > http://www.example.com</url > <parent > <groupId > org.springframework.boot</groupId > <artifactId > spring-boot-starter-parent</artifactId > <version > 2.0.5.RELEASE</version > <relativePath /> </parent > <properties > <project.build.sourceEncoding > UTF-8</project.build.sourceEncoding > <maven.compiler.source > 1.7</maven.compiler.source > <maven.compiler.target > 1.7</maven.compiler.target > </properties > <dependencies > <dependency > <groupId > org.springframework.boot</groupId > <artifactId > spring-boot-starter-web</artifactId > </dependency > <dependency > <groupId > junit</groupId > <artifactId > junit</artifactId > <version > 4.11</version > <scope > test</scope > </dependency > </dependencies > <build > <pluginManagement > <plugins > <plugin > <artifactId > maven-clean-plugin</artifactId > <version > 3.1.0</version > </plugin > <plugin > <artifactId > maven-resources-plugin</artifactId > <version > 3.0.2</version > </plugin > <plugin > <artifactId > maven-compiler-plugin</artifactId > <version > 3.8.0</version > </plugin > <plugin > <artifactId > maven-surefire-plugin</artifactId > <version > 2.22.1</version > </plugin > <plugin > <artifactId > maven-jar-plugin</artifactId > <version > 3.0.2</version > </plugin > <plugin > <artifactId > maven-install-plugin</artifactId > <version > 2.5.2</version > </plugin > <plugin > <artifactId > maven-deploy-plugin</artifactId > <version > 2.8.2</version > </plugin > <plugin > <artifactId > maven-site-plugin</artifactId > <version > 3.7.1</version > </plugin > <plugin > <artifactId > maven-project-info-reports-plugin</artifactId > <version > 3.0.0</version > </plugin > </plugins > </pluginManagement > </build > </project >
完成后,需要在入口的App.java中进行SpringBoot的配置,使用@EnableAutoConfiguration注解,使用后SpringBoot会帮助我们自动启动一个内置的Tomcat并且添加进去默认的配置。
1 2 3 4 5 6 7 8 9 10 11 12 13 14 15 16 17 18 19 20 21 package com.miaoshaproject;import org.springframework.boot.SpringApplication;import org.springframework.boot.autoconfigure.EnableAutoConfiguration;@EnableAutoConfiguration public class App public static void main ( String[] args ) { System.out.println( "Hello World!" ); SpringApplication.run(App.class ,args ) ; } }
接下来,我们如何用SpringBoot来搞定SpringMVC的功能呢?
先加@RestController注解,然后定义一个用@RequestMapping注解注释的方法,当用户访问”/“路径的时候,会调用home()方法。也就是说,用@RestController和@RequestMapping这两个注解实现了传统Spring MVC需要配置servlet、web.xml等等复杂的配置。SpringBoot用这两个注解就可以搞定了。
1 2 3 4 5 6 7 8 9 10 11 12 13 14 15 16 17 18 19 20 21 22 23 24 25 26 27 28 29 30 31 package com.miaoshaproject;import org.springframework.boot.SpringApplication;import org.springframework.boot.autoconfigure.EnableAutoConfiguration;import org.springframework.web.bind.annotation.RequestMapping;import org.springframework.web.bind.annotation.RestController;@EnableAutoConfiguration @RestController public class App @RequestMapping ("/" ) public String home () return "ni hao,zhe shi HOME method!" ; } public static void main ( String[] args ) { System.out.println( "Hello World!" ); SpringApplication.run(App.class ,args ) ; } }
MyBatis接入SpringBoot项目 接下来引入Mybatis来实现对数据库的读和写操作。
首先,SpringBoot实际上提供了一个可以使用默认化的配置,在resources文件夹下可以创建properties配置文件来作为默认的配置。
我们这里定义一个默认的配置文件,application.properties,在其中配置服务端的默认端口,比如改成8090:
server.port=8090
则项目启动的时候Tomcat默认的端口就是8090。
然后再pom.xml配置文件中加入对mybatis起效的配置:
1 2 3 4 5 6 7 8 9 10 11 12 13 14 15 16 17 <dependency > <groupId > mysql</groupId > <artifactId > mysql-connector-java</artifactId > <version > 5.1.41</version > </dependency > <dependency > <groupId > com.alibaba</groupId > <artifactId > druid</artifactId > <version > 1.1.3</version > </dependency > <dependency > <groupId > org.mybatis.spring.boot</groupId > <artifactId > mybatis-spring-boot-starter</artifactId > <version > 1.3.1</version > </dependency >
分别是对数据库的依赖、阿里巴巴数据库连接池的依赖、mybatis对spring-boot进行操作的依赖。
然后再加上其他的配置,最后如下:
1 2 3 4 5 6 7 8 9 10 11 12 13 14 15 16 17 18 19 20 21 22 23 24 25 26 27 28 29 30 31 32 33 34 35 36 37 38 39 40 41 42 43 44 45 46 47 48 49 50 51 52 53 54 55 56 57 58 59 60 61 62 63 64 65 66 67 68 69 70 71 72 73 74 75 76 77 78 79 80 81 82 83 84 85 86 87 88 89 90 91 92 93 94 95 96 97 98 99 100 101 102 103 104 105 106 107 108 109 110 111 112 113 114 115 116 117 118 119 120 121 122 123 124 125 126 127 128 129 130 131 132 133 134 135 136 137 138 139 140 141 142 143 144 <?xml version="1.0" encoding="UTF-8"?> <project xmlns ="http://maven.apache.org/POM/4.0.0" xmlns:xsi ="http://www.w3.org/2001/XMLSchema-instance" xsi:schemaLocation ="http://maven.apache.org/POM/4.0.0 http://maven.apache.org/xsd/maven-4.0.0.xsd" > <modelVersion > 4.0.0</modelVersion > <groupId > com.miaoshaproject</groupId > <artifactId > miaosha</artifactId > <version > 1.0-SNAPSHOT</version > <name > miaosha</name > <url > http://www.example.com</url > <parent > <groupId > org.springframework.boot</groupId > <artifactId > spring-boot-starter-parent</artifactId > <version > 2.0.5.RELEASE</version > <relativePath /> </parent > <properties > <project.build.sourceEncoding > UTF-8</project.build.sourceEncoding > <maven.compiler.source > 1.7</maven.compiler.source > <maven.compiler.target > 1.7</maven.compiler.target > </properties > <dependencies > <dependency > <groupId > org.springframework.boot</groupId > <artifactId > spring-boot-starter-web</artifactId > </dependency > <dependency > <groupId > mysql</groupId > <artifactId > mysql-connector-java</artifactId > <version > 5.1.41</version > </dependency > <dependency > <groupId > com.alibaba</groupId > <artifactId > druid</artifactId > <version > 1.1.3</version > </dependency > <dependency > <groupId > org.mybatis.spring.boot</groupId > <artifactId > mybatis-spring-boot-starter</artifactId > <version > 1.3.1</version > </dependency > <dependency > <groupId > junit</groupId > <artifactId > junit</artifactId > <version > 4.11</version > <scope > test</scope > </dependency > </dependencies > <build > <pluginManagement > <plugins > <plugin > <artifactId > maven-clean-plugin</artifactId > <version > 3.1.0</version > </plugin > <plugin > <artifactId > maven-resources-plugin</artifactId > <version > 3.0.2</version > </plugin > <plugin > <artifactId > maven-compiler-plugin</artifactId > <version > 3.8.0</version > </plugin > <plugin > <artifactId > maven-surefire-plugin</artifactId > <version > 2.22.1</version > </plugin > <plugin > <artifactId > maven-jar-plugin</artifactId > <version > 3.0.2</version > </plugin > <plugin > <artifactId > maven-install-plugin</artifactId > <version > 2.5.2</version > </plugin > <plugin > <artifactId > maven-deploy-plugin</artifactId > <version > 2.8.2</version > </plugin > <plugin > <artifactId > maven-site-plugin</artifactId > <version > 3.7.1</version > </plugin > <plugin > <artifactId > maven-project-info-reports-plugin</artifactId > <version > 3.0.0</version > </plugin > <plugin > <groupId > org.mybatis.generator</groupId > <artifactId > mybatis-generator-maven-plugin</artifactId > <version > 1.3.5</version > <dependencies > <dependency > <groupId > org.mybatis.generator</groupId > <artifactId > mybatis-generator-core</artifactId > <version > 1.3.5</version > </dependency > <dependency > <groupId > mysql</groupId > <artifactId > mysql-connector-java</artifactId > <version > 5.1.41</version > </dependency > </dependencies > <executions > <execution > <id > mybatis generator</id > <phase > package</phase > <goals > <goal > generate</goal > </goals > </execution > </executions > <configuration > <verbose > true</verbose > <overwrite > true</overwrite > <configurationFile > src/main/resources/mybatis-generator.xml </configurationFile > </configuration > </plugin > </plugins > </pluginManagement > </build > </project >
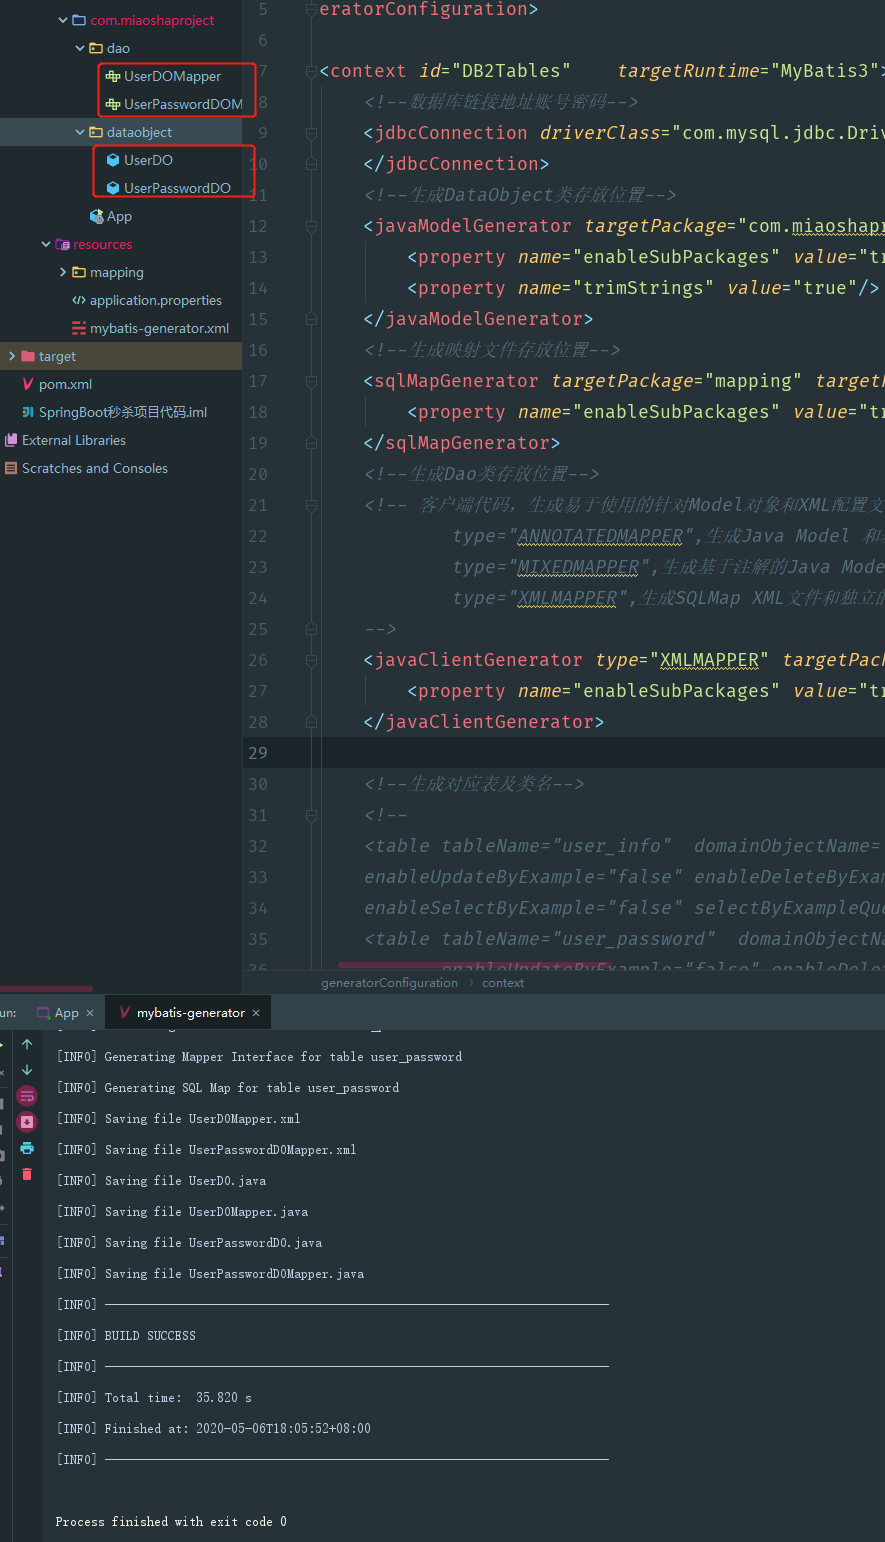
Mybatis自动生成器的使用方式 接下来编写mybatis-generator文件,这个文件编写过程是比较漫长的。
首先按照之前在pom.xml中配置的,在resources文件夹下创建mybatis-generator.xml文件,现在还是空的,我们先设计并实现数据库,这样才能用mybatis-generator工具生成供mybatis使用的工具类。
对于企业级开发,实际上数据库的模型设计非常重要,要设计的好才行。
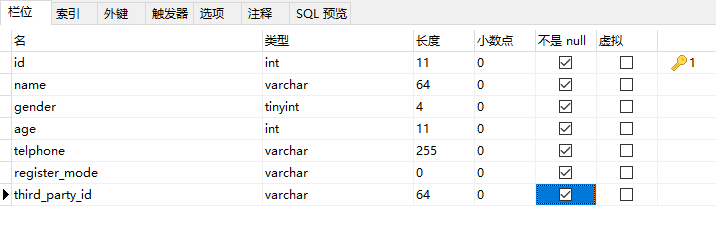
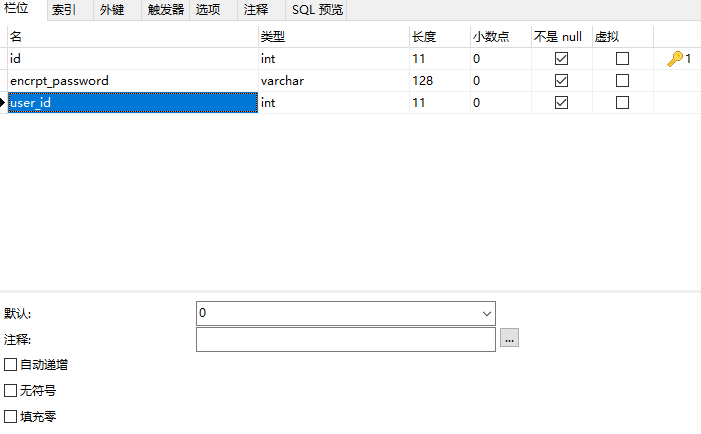
我们创建一个数据库(miaosha),创建多张表。为其中设置多个属性。
为了安全考虑,密码是加密的字符串,不和这些属性设置在一张表里,而是单独设置成一张表(user_password)。
然后当然就是使用Mybatis的配置文件mybatis-generator.xml进行配置。注意一些路径需要我们根据项目修改模板、创建对应的文件夹。
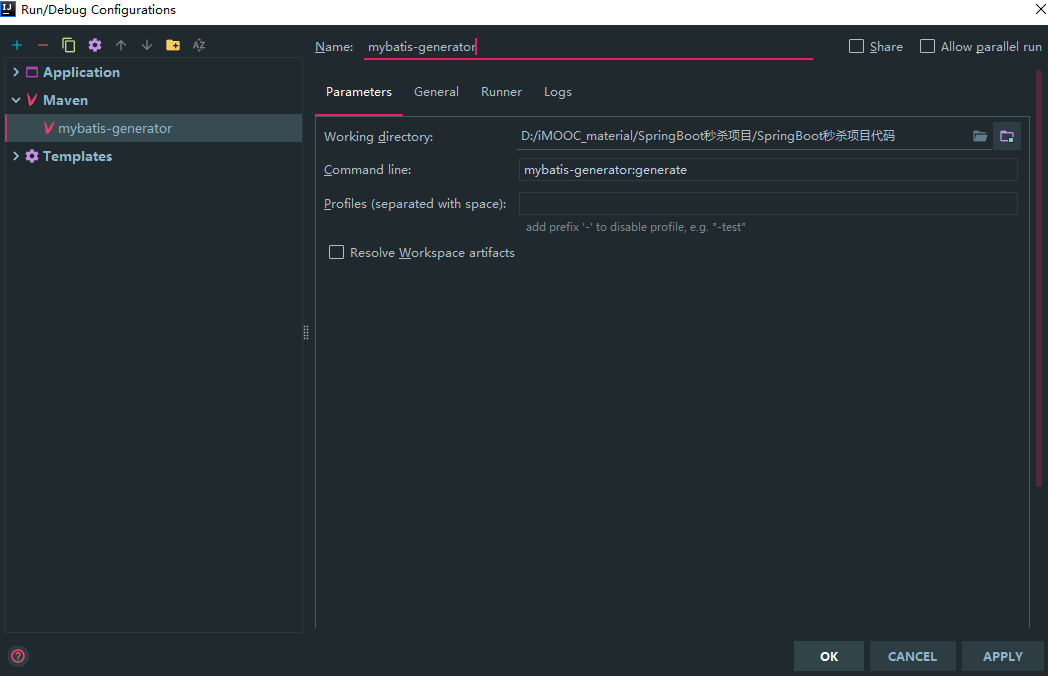
在使用的时候,配置maven的启动项:
需要注意,实际开发中,很少会使用复杂的查询,就算用到了,我们也宁愿用自动编写的方式去做,而不是直接在SQL语句中使用对应的example去做。我们可以在mybatis-generator.xml中配置属性来将example去除掉。具体做法是写:
1 2 3 4 5 6 <table tableName ="user_info" domainObjectName ="UserDO" enableCountByExample ="false" enableUpdateByExample ="false" enableDeleteByExample ="false" enableSelectByExample ="false" selectByExampleQueryId ="false" > </table > <table tableName ="user_password" domainObjectName ="UserPasswordDO" enableCountByExample ="false" enableUpdateByExample ="false" enableDeleteByExample ="false" enableSelectByExample ="false" selectByExampleQueryId ="false" > </table >
这样,在生成了对应的类文件之后,不需要example之类的文件:
接下来需要接入mybatis对应的mybatis的数据源了(刚才是使用mybatis-generator工具生成了个根据数据库内容而供mybatis使用的映射类。但是mybatis和数据库本身还没有连接上)
在配置文件application.properties中进行配置
1 2 3 4 5 6 7 8 9 10 11 server.port =8090 mybatis.mapperLocations =classpath:mapping/*.xml spring.datasource.name =miaosha spring.datasource.url =jdbc:mysql://URL/miaosha spring.datasource.username =root spring.datasource.password =root spring.datasource.type =com.alibaba.druid.pool.DruidDataSource spring.datasource.driverClassName =com.mysql.jdbc.Driver
然后再App.java中编写,让SpringBoot扫描Mybatis的一些配置文件和之后要做的一些service的封装。
1 2 3 4 5 6 7 8 9 10 11 12 13 14 15 16 17 18 19 20 21 22 23 24 25 26 27 28 29 30 31 32 33 34 35 @SpringBootApplication (scanBasePackages = {"com.miaoshaproject" })@RestController @MapperScan ("com.miaoshaproject.dao" )public class App @Resource private UserDOMapper userDOMapper; @RequestMapping ("/" ) public String home () UserDO userDO = userDOMapper.selectByPrimaryKey(1 ); if (userDO == null ) { return "用户对象不存在!" ; } else { return userDO.getName(); } } public static void main ( String[] args ) { System.out.println( "Hello World!" ); SpringApplication.run(App.class ,args ) ; } }
但是,真正企业级项目中,这个只能作为调试用。企业级项目中需要通过SpringMVC进行创建。
用户模块开发 使用SpringMVC方式开发用户信息 模拟真正企业级项目开发。
首先,自上而下,需要一个controller层,然后往下是service层。
UserService接口:
1 2 3 4 5 6 package com.miaoshaproject.service;public interface UserService void getUserById (Integer id) }
UserServiceImpl,接口实现类:
1 2 3 4 5 6 7 8 9 10 11 12 13 14 15 16 @Service public class UserServiceImpl implements UserService @Resource private UserDOMapper userDOMapper; @Override public void getUserById (Integer id) UserDO userDO = userDOMapper.selectByPrimaryKey(id); } }
注意,这里为什么在getUserById()方法中没有返回值呢?
这点非常重要,在企业级项目开发中,是要分层的。首先之前定义的dataobject包,里面存储的都是和数据库一一对应的字段,dataobject中不含有逻辑,是一个最简单的映射。
但是在Service层中,不可以简单地把对应数据库的映射直接后传返回给想要这个Service的服务。也就是说,在Service层,必须要有一个Model的概念 。
在service层下新建一个model包。这个model才是我们真正定义SpringMVC中业务逻辑交互的模型的概念。
我们定义一个UserModel类。
1 2 3 4 5 6 7 8 9 10 11 12 13 14 15 16 17 18 19 20 21 22 23 24 25 26 27 28 29 30 31 32 33 34 35 36 37 38 39 40 41 42 43 44 45 46 47 48 49 50 51 52 53 54 55 56 57 58 59 60 61 62 63 64 65 66 67 68 69 70 71 72 73 74 75 public class UserModel private Integer id; private String name; private Byte gender; private Integer age; private String telphone; private String registerMode; private String thirdPartyId; private String encrptPassword; public String getEncrptPassword () return encrptPassword; } public void setEncrptPassword (String encrptPassword) this .encrptPassword = encrptPassword; } public Integer getId () return id; } public void setId (Integer id) this .id = id; } public String getName () return name; } public void setName (String name) this .name = name; } public Byte getGender () return gender; } public void setGender (Byte gender) this .gender = gender; } public Integer getAge () return age; } public void setAge (Integer age) this .age = age; } public String getTelphone () return telphone; } public void setTelphone (String telphone) this .telphone = telphone; } public String getRegisterMode () return registerMode; } public void setRegisterMode (String registerMode) this .registerMode = registerMode; } public String getThirdPartyId () return thirdPartyId; } public void setThirdPartyId (String thirdPartyId) this .thirdPartyId = thirdPartyId; } }
需要注意,这里关键在于密码。dataobject只是对数据库的映射,UserModel类中有密码,这才是User被操作的真正的类对象。
然后,我们需要在UserPasswordDOMapper.xml文件中进行配置
1 2 3 4 5 6 <select id ="selectByUserId" parameterType ="java.lang.Integer" resultMap ="BaseResultMap" > select <include refid ="Base_Column_List" /> from user_password where user_id = #{userId,jdbcType=INTEGER} </select >
然后再在UserPasswordDOMapper.java文件中定义之前id中已经写好的selectByUserId方法。
UserPasswordDO selectByUserId(Integer userId);
然后重构UserServiceImpl.java文件:
1 2 3 4 5 6 7 8 9 10 11 12 13 14 15 16 17 18 19 20 21 22 23 24 25 26 27 28 29 30 31 32 33 34 35 36 37 38 39 40 @Service public class UserServiceImpl implements UserService @Resource private UserDOMapper userDOMapper; @Resource private UserPasswordDOMapper userPasswordDOMapper; @Override public UserModel getUserById (Integer id) UserDO userDO = userDOMapper.selectByPrimaryKey(id); if (userDO == null ) { return null ; } UserPasswordDO userPasswordDO = userPasswordDOMapper.selectByUserId(userDO.getId()); return convertFromDataObject(userDO,userPasswordDO); } private UserModel convertFromDataObject (UserDO userDO, UserPasswordDO userPasswordDO) if (userDO == null ) { return null ; } UserModel userModel = new UserModel(); BeanUtils.copyProperties(userDO,userModel); if (userPasswordDO != null ) { userModel.setEncrptPassword(userPasswordDO.getEncrptPassword()); } return userModel; } }
此时返回的是UserModel了,根据UserDO来获取到用户的dataobject内容,再同时根据UserPasswordDO来进一步获取用户的密码。
最后在controller中写请求的URL的内容逻辑:
1 2 3 4 5 6 7 8 9 10 11 12 13 14 15 16 @Controller ("user" )@RequestMapping ("/user" )public class UserController @Autowired private UserService userService; @RequestMapping ("/get" ) @ResponseBody public UserModel getUser (@RequestParam(name = "id" ) Integer id) UserModel userModel = userService.getUserById(id); return userModel; } }
之后启动系统,访问http://localhost:8090/user/get?id=1,可以得到对应的保存在数据库中的结果。
1 2 3 4 5 6 7 8 9 10 { "id" : 1 , "name" : "第一个用户" , "gender" : 1 , "age" : null , "telphone" : "134578856541" , "registerMode" : "byphone" , "thirdPartyId" : "" , "encrptPassword" : "asdfdsgsfdgsd" }
虽然用户的密码被加密过,但是用户的密码不能够直接被前端请求得到,这样的做法非常不专业。
如何解决呢?——问题出在我们把userModel直接返回给了前端。前端只需要拿到需要展示的内容即可,不要把整个领域模型都拿给前端。
我们在controller包下定义view model,定义一个viewobject包,把需要返回给前端的模型都定义在这个包下。然后在这个包下定义UserVO,其字段与UserModel相比,只需要给前端返回的字段即可:
1 2 3 4 5 6 7 8 9 10 11 12 13 14 15 16 17 18 19 20 21 22 23 24 25 26 27 28 29 30 31 32 33 34 35 36 37 38 39 40 41 42 43 44 45 46 47 public class UserVO private Integer id; private String name; private Byte gender; private Integer age; private String telphone; public Integer getId () return id; } public void setId (Integer id) this .id = id; } public String getName () return name; } public void setName (String name) this .name = name; } public Byte getGender () return gender; } public void setGender (Byte gender) this .gender = gender; } public Integer getAge () return age; } public void setAge (Integer age) this .age = age; } public String getTelphone () return telphone; } public void setTelphone (String telphone) this .telphone = telphone; } }
定义通用的返回对象——返回正确信息 实际开发中,如果就按照上面写的,程序直接返回需要在前端展示的内容,那么如果程序出错了,不加以处理的话,直接返回一个错误码,前端的调试是无从下手的。
创建一个response包,用来编写返回的内容。
1 2 3 4 5 6 7 8 9 10 11 12 13 14 15 16 17 18 19 20 21 22 23 24 25 26 27 28 29 30 31 32 33 34 35 36 37 38 39 public class CommonReturnType private String status; private Object data; public static CommonReturnType create (Object result) return CommonReturnType.create(result, "success" ); } public static CommonReturnType create (Object result, String status) CommonReturnType type = new CommonReturnType(); type.setStatus(status); type.setData(result); return type; } public String getStatus () return status; } public void setStatus (String status) this .status = status; } public Object getData () return data; } public void setData (Object data) this .data = data; } }
下面进行使用这个类,修改UserController方法中的getUser()方法,改变返回的对象的类型为CommonReturnType:
1 2 3 4 5 6 7 8 9 10 11 12 13 14 @RequestMapping ("/get" ) @ResponseBody public CommonReturnType getUser (@RequestParam(name = "id" ) Integer id) UserModel userModel = userService.getUserById(id); UserVO userVO = convertFromModel(userModel); return CommonReturnType.create(userVO); }
之后启动项目,会发现返回结果中带有status状态码。而且状态码和data分开:
1 2 3 4 5 6 7 8 9 10 { "status" : "success" , "data" : { "id" : 1 , "name" : "第一个用户" , "gender" : 1 , "age" : 30 , "telphone" : "134578856541" } }
定义通用的返回对象——返回错误信息 上一节定义了success的返回值。这里可以再定义一下出了错,fail的返回值。
首先要自己定义对应的通用的错误形式。创建一个error包。接下来一个比较取巧的方法,是尝试在一个可视化界面中能够完整的对应的描述。
创建一个接口CommonError。
1 2 3 4 5 6 public interface CommonError public int getErrCode () public String getErrMsg () public CommonError setErrMsg (String errMsg) }
然后定义一个枚举,把对应的error的信息取出来。
注意,在分布式开发的时候,经常需要做的就是要在全局有一个统一的状态码 的流。企业级开发中,需要在全局有统一的码的对应。
1 2 3 4 5 6 7 8 9 10 11 12 13 14 15 16 17 18 19 20 21 22 23 24 25 26 27 28 29 30 31 32 33 34 35 36 37 38 39 package com.miaoshaproject.error;public enum EmBusinessError implements CommonError { PARAMETER_VALIDATION_ERROR(10001 ,"参数不合法" ), UNKNOWN_ERROR(10002 ,"未知错误" ), USER_NOT_EXIST(20001 ,"用户不存在" ) ; private EmBusinessError (int errCode,String errMsg) this .errCode = errCode; this .errMsg = errMsg; } private int errCode; private String errMsg; @Override public int getErrCode () return this .errCode; } @Override public String getErrMsg () return this .errMsg; } @Override public CommonError setErrMsg (String errMsg) this .errMsg = errMsg; return this ; } }
接下来新建一个Exception来处理所有会报的异常。
1 2 3 4 5 6 7 8 9 10 11 12 13 14 15 16 17 18 19 20 21 22 23 24 25 26 27 28 29 30 31 32 33 34 public class BusinessException extends Exception implements CommonError private CommonError commonError; public BusinessException (CommonError commonError) super (); this .commonError = commonError; } public BusinessException (CommonError commonError, String errMsg) super (); this .commonError = commonError; this .commonError.setErrMsg(errMsg); } @Override public int getErrCode () return this .commonError.getErrCode(); } @Override public String getErrMsg () return this .commonError.getErrMsg(); } @Override public CommonError setErrMsg (String errMsg) this .commonError.setErrMsg(errMsg); return this ; } }
这样一来,EmBusinessError和BusinessException都实现了CommonError这个接口,这样的话外部使用这两个类,都有对应的errCode和errMsg的组装定义。并且需要共同实现一个setErrMsg方法,可以覆盖原本Enum中定义的errMsg。
在controller中尝试使用这两个类:
1 2 3 4 5 6 7 8 9 10 11 12 13 14 15 16 17 18 19 20 21 22 23 24 25 26 27 28 29 30 31 32 33 34 35 36 37 38 39 @Controller ("user" )@RequestMapping ("/user" )public class UserController @Autowired private UserService userService; @RequestMapping ("/get" ) @ResponseBody public CommonReturnType getUser (@RequestParam(name = "id" ) Integer id) throws BusinessException UserModel userModel = userService.getUserById(id); if (userModel == null ) { throw new BusinessException(EmBusinessError.USER_NOT_EXIST); } UserVO userVO = convertFromModel(userModel); return CommonReturnType.create(userVO); } private UserVO convertFromModel (UserModel userModel) if (userModel == null ) { return null ; } UserVO userVO = new UserVO(); BeanUtils.copyProperties(userModel,userVO); return userVO; } }
但是此时如果访问了不存在的用户(比如id=2),那么页面还是会报500,因为我们没有针对异常进行处理。下面来处理抛出的异常。
定义通用的返回对象——异常处理 接下来使用SpringBoot自带的SpringMVC的HandlerException来解决通用的异常处理。
一开始,只会把异常抛出到Tomcat的容器层,而这个容器层处理异常的方式只会返回500的错误页。但是这里其实可以定义exceptionhandler解决未被controller层吸收的exception异常。
为什么有这样的设计思想呢?——对于web系统,controller层的异常在某种意义上来说是业务处理的最后一道关口 。为了让用户看到的页面不是单纯一个500异常的很挫的页面,我们可以自定义500页面并且返回。
使用方式,可以直接用注解@ExceptionHandler。代码都是写在controller层的UserController.java中
实际上对于BusinessError这种异常来说,不应该直接返回500的服务器异常,而应该写代码指定说是业务逻辑上出了问题,不是服务端不能处理的错误。
1 2 3 4 5 6 7 8 9 10 11 12 13 14 15 16 17 @ExceptionHandler (Exception.class ) @ResponseStatus (HttpStatus .OK ) @ResponseBody public Object handlerException (HttpServletRequest request ,Exception ex ) Map<String,Object> responseData = new HashMap<>(); if (ex instanceof BusinessException) { BusinessException businessException = (BusinessException) ex; responseData.put("errCode" ,businessException.getErrCode()); responseData.put("errMsg" ,businessException.getErrMsg()); } else { responseData.put("errCode" ,EmBusinessError.UNKNOWN_ERROR.getErrCode()); responseData.put("errMsg" ,EmBusinessError.UNKNOWN_ERROR.getErrMsg()); } return CommonReturnType.create(responseData,"fail" ); }
这样在发送请求的时候,如果不能够根据id找到用户,那么会抛出用户不存在的异常。
但是如果异常不是之前写好的”找不到用户”,那么目前可以划分到”未知错误”,会返回得到”未知错误”。
到了这里,其实还可以用面向对象的思维方式进行优化 。因为虽然这部分写在了UserController.java中,但是这个逻辑其实是所有controller都想用的公用逻辑。我们把它集成到一个BaseController中(当然,UserController中就可以删掉这部分代码),然后让userController继承BaseController即可。
1 2 3 4 5 6 7 8 9 10 11 12 13 14 15 16 17 18 19 20 public class BaseController @ExceptionHandler (Exception.class ) @ResponseStatus (HttpStatus .OK ) @ResponseBody public Object handlerException (HttpServletRequest request , Exception ex ) { Map<String,Object> responseData = new HashMap<>(); if (ex instanceof BusinessException) { BusinessException businessException = (BusinessException) ex; responseData.put("errCode" ,businessException.getErrCode()); responseData.put("errMsg" ,businessException.getErrMsg()); } else { responseData.put("errCode" , EmBusinessError.UNKNOWN_ERROR.getErrCode()); responseData.put("errMsg" ,EmBusinessError.UNKNOWN_ERROR.getErrMsg()); } return CommonReturnType.create(responseData,"fail" ); } }
总结一下我们做了哪些事情:
我们自己定义了CommonReturnType,可以用对应的String status加一个Object data的方式返回所有的JSON序列化方式对应的对象,摒弃了HTTPStatus Code+Tomcat自带Error页的方式去处理。
定义了BussinessException,统一管理我们想要的错误码。
在BaseController中定义了一个通用的handlerException类,来解决未被controller层吸收的Exception,并且使用了errCode+errMsg的统一的定义方式,吃掉了内部所有的不可预知的异常。
到此为止,我们就已经完成了项目基础能力建设 的工作了。下面需要开始搭建模型能力的管理 部分。
用户模型管理——otp验证码获取 什么是模型能力管理 呢?在开发中,会有一个领域模型的概念。比如用户这个模型会有多个步骤来构建一个完整的生命周期,比如注册是第一步、用户信息浏览登录是第二步,等等。
对于用户管理,我们接下来要做的就是:
所谓otp,就是给用户发一条短信,让用户把短信中的验证码作为注册的信息。
在UserController中写这段代码。
1 2 3 4 5 6 7 8 9 10 11 12 13 14 15 16 17 18 19 20 21 22 23 24 25 26 27 @Autowired private HttpServletRequest httpServletRequest; @RequestMapping ("/getotp" ) @ResponseBody public CommonReturnType getOtp (@RequestParam(name = "telphone" ) String telphone) Random random = new Random(); int randomInt = random.nextInt(99999 ); randomInt += 10000 ; String otpCode = String.valueOf(randomInt); httpServletRequest.getSession().setAttribute(telphone,otpCode); System.out.println("telphone = " + telphone + " & otpCode = " + otpCode); return CommonReturnType.create(null ); }
进行这段代码的功能调试,可以输入URL:http://localhost:8090/user/getotp?telphone=13544444444,得到的结果是:
1 2 3 4 { "status" : "success" , "data" : null }
用户模型管理——Metronic模板简介 下面采取前后端分离的模式,把用户注册的界面做出来。
这里的前端界面,使用了Metronic模板,实际上这个模板是基于Bootstrap的。只需要引入一行CSS或者JS代码,就可以实现很酷炫的效果。
作为后端开发,实际上在admin这样的开发,对于页面美化要求不高,那么是要后端自己写的。
用户模型管理——getotp页面实现 这个页面主要实现输入用户的手机的框,然后再加一个submit的按钮来完成获取用户短信的内容。
需要注意,在输入手机号的这一栏,我们用到了name和id。
1 <input type ="text" placeholder ="手机号" name ="telphone" id ="telphone" >
为什么呢?因为这里用到的是前后端分离的项目,要用ajax请求,而不用post的方式。
整个的页面代码:
1 2 3 4 5 6 7 8 9 10 11 12 13 14 15 16 17 18 19 20 21 22 23 24 25 26 27 28 29 30 31 32 33 34 35 36 37 38 39 40 41 42 43 44 45 46 47 48 49 50 51 52 53 54 55 56 57 58 59 60 61 62 63 64 65 <!DOCTYPE html> <html lang="en" > <head> <meta charset="UTF-8" > <script src="static/assets/global/plugins/jquery-1.11.0.min.js" type="text/javascript" > </script> <title>GETOTP</ title></head> <body> <div> <h3>获取otp信息</ h3> <div> <label>手机号</label> <div> <input type="text" placeholder="手机号" name="telphone" id="telphone"> </ div> </div> <div> <button id="getotp" type="submit"> 获取otp短信 </ button> </div> </ div></body> <script> jQuery(document).ready(function(){ / /绑定otp的click事件用于向后端发送手机验证码的请求 $("#getotp").on("click",function(){ var telphone = $("#telphone").val(); if(telphone == null || telphone == ""){ alert("手机号不能为空"); / /这里返回false是为了不让它被冒泡传递到上一层 return false; } $.ajax({ type:"POST", contentType:"application/ x-www-form-urlencoded", url:" http: data:{ "telphone" :$("#telphone" ).val(), }, success:function (data ) if (data.status == "success" ) { alert("otp已经发送到了您的手机上,请注意查收" ); } else { alert("otp发送失败,原因为" + data.data.errMsg); } }, error:function (data ) alert("otp发送失败,原因为" + data.responseText); } }); return false ; }); }); </script> </ html>
这样写完需要注意,此时如果直接把otp从后端发送到ajax的前端页面,会出现跨域错误,因为。
1 Access to XMLHttpRequest at 'http://localhost:8090/user/getotp' from origin 'null' has been blocked by CORS policy : No 'Access-Control-Allow-Origin' header is present on the requested resource.
虽然请求能够正确地达到服务端,并且服务端也能正确返回,但是ajax的回调认定,他们俩的域不同,这种回调是不安全的。因此会报错并且走不到ajax的success的block中。
在SpringBoot中提供了简单的注解形式,加上@CrossOrigin即可。
用户模型管理——getotp页面美化 上面完成的页面效果太简单了,我们需要美化一下。
1 2 3 4 5 6 7 8 9 10 11 12 13 14 15 16 17 18 19 20 21 22 23 24 25 26 27 28 <!DOCTYPE html> <html lang="en" > <head> <meta charset="UTF-8" > <link rel="stylesheet" type="text/css" href="static/assets/global/plugins/bootstrap/css/bootstrap.min.css" > <link rel="stylesheet" type="text/css" href="static/assets/global/css/components.css" > <link rel="stylesheet" type="text/css" href="static/assets/admin/pages/css/login.css" > <script src="static/assets/global/plugins/jquery-1.11.0.min.js" type="text/javascript" > </script> <title>GETOTP</ title></head> <body class="login"> <div class="content"> <h3 class="form-title">获取otp信息</ h3> <div> <label class "control-label" >手机号</label> <div class="form-group"> <input class="form-control" type="text" placeholder="手机号" name="telphone" id="telphone"> </ div> </div> <div class="form-actions"> <button id="getotp" type="submit" class="btn blue"> 获取otp短信 </ button> </div> </ div></body>
做法其实就是引入样式模板中写好的class即可。
用户模型管理——用户注册功能实现 在UserController中写一个注册方法,如果没通过校验,则报错。如果通过校验,需要在UserService接口中声明register方法,并且在UserServbiceImpl中实现这个方法。
在实现过程中,我们还需要引入一个Apache的Common包
1 2 3 4 5 6 <dependency > <groupId > org.apache.commons</groupId > <artifactId > commons-lang3</artifactId > <version > 3.7</version > </dependency >
然后完成注册和两个对应的转化的方法。
1 2 3 4 5 6 7 8 9 10 11 12 13 14 15 16 17 18 19 20 21 22 23 24 25 26 27 28 29 30 31 32 33 34 35 36 37 38 39 40 41 42 43 44 45 46 47 48 49 50 51 52 53 54 55 56 57 58 59 60 @Override @Transactional public void register (UserModel userModel) throws BusinessException if (userModel == null ) { throw new BusinessException(EmBusinessError.PARAMETER_VALIDATION_ERROR); } if (StringUtils.isEmpty(userModel.getName()) || userModel.getGender() == null || userModel.getAge() == null || StringUtils.isEmpty(userModel.getTelphone())) { throw new BusinessException(EmBusinessError.PARAMETER_VALIDATION_ERROR); } UserDO userDO = convertFromModel(userModel); userDOMapper.insertSelective(userDO); UserPasswordDO userPasswordDO = convertPasswordFromModel(userModel); userPasswordDOMapper.insertSelective(userPasswordDO); return ; } private UserPasswordDO convertPasswordFromModel (UserModel userModel) if (userModel == null ) { return null ; } UserPasswordDO userPasswordDO = new UserPasswordDO(); userPasswordDO.setEncrptPassword(userModel.getEncrptPassword()); userPasswordDO.setUserId(userModel.getId()); return userPasswordDO; } private UserDO convertFromModel (UserModel userModel) if (userModel == null ) { return null ; } UserDO userDO = new UserDO(); BeanUtils.copyProperties(userModel,userDO); return userDO; } private UserModel convertFromDataObject (UserDO userDO, UserPasswordDO userPasswordDO) if (userDO == null ) { return null ; } UserModel userModel = new UserModel(); BeanUtils.copyProperties(userDO,userModel); if (userPasswordDO != null ) { userModel.setEncrptPassword(userPasswordDO.getEncrptPassword()); } return userModel; }
这里需要注意,为什么用的是insertSelective()而不是直接用selective()呢?
因为用insertSelective()不会用null字段覆盖数据库中原有的字段,而单纯的Selective()会允许null字段覆盖数据库原有字段。这个对于update()很有必要。
在一般数据库设计中应当尽量避免使用null字段。因为:
Java对于空字段的处理本身是非常脆弱的
null字段对于前端展示很多时候是没有什么意义的
但是也不是说一定要不使用null。比如有时候我们需要给属性的手机号加上索引,那么手机是否为唯一索引会是一个问题。
完成UserController函数中的register方法
1 2 3 4 5 6 7 8 9 10 11 12 13 14 15 16 17 18 19 20 21 22 23 24 25 26 27 28 29 @RequestMapping (value = "/register" ,method = {RequestMethod.POST},consumes = {CONTENT_TYPE_FORMED})@ResponseBody public CommonReturnType register (@RequestParam(name = "telphone" ) String telphone, @RequestParam (name = "otpCode" ) String otpCode, @RequestParam (name = "name" ) String name, @RequestParam (name = "gender" ) Integer gender, @RequestParam (name = "age" ) Integer age, @RequestParam (name = "password" ) String password) throws BusinessException { String inSessionOtpCode = (String)this .httpServletRequest.getSession().getAttribute(telphone); if (!com.alibaba.druid.util.StringUtils.equals(otpCode,inSessionOtpCode)) { throw new BusinessException(EmBusinessError.PARAMETER_VALIDATION_ERROR,"短信验证码不符合" ); } UserModel userModel = new UserModel(); userModel.setName(name); userModel.setGender(gender); userModel.setAge(age); userModel.setTelphone(telphone); userModel.setRegisterMode("byphone" ); userModel.setEncrptPassword(MD5Encoder.encode(password.getBytes())); userService.register(userModel); return CommonReturnType.create(null ); }
接下来解决前端界面的问题。
1 2 3 4 5 6 7 8 9 10 11 12 13 14 15 16 17 18 19 20 21 22 23 24 25 26 27 28 29 30 31 32 33 34 35 36 37 38 39 40 41 42 43 44 45 46 47 48 49 50 51 52 53 54 55 56 57 58 59 60 61 62 63 64 65 66 67 68 69 70 71 72 73 74 75 76 77 78 79 80 81 82 83 84 85 86 87 88 89 90 91 92 93 94 95 96 97 98 99 100 101 102 103 104 105 106 107 108 109 110 111 112 113 114 115 116 117 118 119 120 121 122 123 124 125 126 127 128 129 130 131 132 133 134 <!DOCTYPE html> <html lang="en" > <head> <meta charset="UTF-8" > <link rel="stylesheet" type="text/css" href="static/assets/global/plugins/bootstrap/css/bootstrap.min.css" > <link rel="stylesheet" type="text/css" href="static/assets/global/css/components.css" > <link rel="stylesheet" type="text/css" href="static/assets/admin/pages/css/login.css" > <script src="static/assets/global/plugins/jquery-1.11.0.min.js" type="text/javascript" > </script> <title>注册</ title></head> <body class="login"> <div class="content"> <h3 class="form-title">用户注册</ h3> <div class "form-group" > <label class "control-label" >手机号</label> <div> <input class="form-control" type="text" placeholder="手机号" name="telphone" id="telphone"/ > </div> </ div> <div class "form-group" > <label class "control-label" >验证码</label> <div> <input class="form-control" type="text" placeholder="验证码" name="otpCode" id="otpCode"/ > </div> </ div> <div class "form-group" > <label class "control-label" >用户昵称</label> <div> <input class="form-control" type="text" placeholder="用户昵称" name="name" id="name"/ > </div> </ div> <div class "form-group" > <label class "control-label" >性别</label> <div> <input class="form-control" type="text" placeholder="性别" name="gender" id="gender"/ > </div> </ div> <div class "form-group" > <label class "control-label" >年龄</label> <div> <input class="form-control" type="text" placeholder="年龄" name="age" id="age"/ > </div> </ div> <div class "form-group" > <label class "control-label" >密码</label> <div> <input class="form-control" type="password" placeholder="密码" name="password" id="password"/ > </div> </ div> <div class "form-actions" > <button id="register" type="submit" class "btn blue" > 提交注册 </button> </ div> </div> </ body><script> jQuery(document ).ready(function ( $("#register" ).on("click" ,function ( var telphone = $("#telphone" ).val(); var password = $("#password" ).val(); var age = $("#age" ).val(); var gender = $("#gender" ).val(); var name = $("#name" ).val(); var otpCode = $("#otpCode" ).val(); if (telphone == null || telphone == "" ){ alert("手机号不能为空" ); return false ; } if (password == null || password == "" ){ alert("密码不能为空" ); return false ; } if (age == null || age == "" ){ alert("年龄不能为空" ); return false ; } if (gender == null || gender == "" ){ alert("年龄不能为空" ); return false ; } if (name == null || name == "" ){ alert("姓名不能为空" ); return false ; } if (otpCode == null || otpCode == "" ){ alert("验证码不能为空" ); return false ; } $.ajax({ type:"POST" , contentType:"application/x-www-form-urlencoded" , url:"http://localhost:8090/user/register" , data:{ "telphone" :$("#telphone" ).val(), "password" :password, "age" :age, "gender" :gender, "name" :name, "otpCode" :otpCode }, xhrFields:{withCredentials :true }, success:function (data ) if (data.status == "success" ) { alert("注册成功" ); } else { alert("注册失败,原因为" + data.data.errMsg); } }, error:function (data ) alert("注册失败,原因为" + data.responseText); } }); return false ; }); }); </script> </ html>
需要注意,后端做了校验,前端也要做校验。因为校验总是要在离用户最近的地方。这样用户的体验更好。
遇到的问题:
加了CrossOrigin注解,也没有办法直接做到跨域共享
解决方法是指定更细的ajax请求域。
@CrossOrigin(allowCredentials = "true",allowedHeaders = "*")
DEFAULT_ALOWED_HEADERS允许跨域传输所有的header参数,将用于使用token放入header域做session共享的跨域请求。DEFAULT_ALLOW_CREDENTIALS = true:需要配合前端设置 xhrFields 授信后使得跨域session共享
在发送ajax请求的时候,我们需要指定xhrField对应的参数:
xhrFields:{withCredentials:true}
这个参数用于允许跨域的授信请求,使其session变成跨域可授信。
在MD5加密的时候不能直接用Util工具,要写出复杂一些的加密方法
如下:
1 2 3 4 5 6 7 8 public String EncodeByMd5 (String str) throws NoSuchAlgorithmException, UnsupportedEncodingException MessageDigest md5 = MessageDigest.getInstance("MD5" ); BASE64Encoder base64en = new BASE64Encoder(); String newstr = base64en.encode(md5.digest(str.getBytes("utf-8" ))); return newstr; }
然后,在UserDOMapper中,因为要保证id是感知到数据库进行自增的,需要设置两个参数:
<insert id="insertSelective" parameterType="com.miaoshaproject.dataobject.UserDO" keyProperty="id" useGeneratedKeys="true">
此外,要保证手机号不能重复,即数据库中不能出现重的手机号。解决方法就是在user_info表中将telphone字段设置成唯一索引。
插入索引后,为了给用户好的体验,把可能报的异常catch住。
1 2 3 4 5 6 7 8 UserDO userDO = convertFromModel(userModel); try { userDOMapper.insertSelective(userDO); } catch (DuplicateKeyException ex) { throw new BusinessException(EmBusinessError.PARAMETER_VALIDATION_ERROR,"手机号已被注册" ); }
用户模型管理——用户登录功能实现 要完成这个功能,需要在UserService中定义新的登录方法(当然,先在接口中声明)。
1 2 3 4 5 UserModel validateLogin (String telphone, String encrptPassword) throws BusinessException ;
然后实现:
1 2 3 4 5 6 7 8 9 10 11 12 13 14 15 16 17 18 19 @Override public UserModel validateLogin (String telphone, String encrptPassword) throws BusinessException UserDO userDO = userDOMapper.selectByTelphone(telphone); if (userDO == null ) { throw new BusinessException(EmBusinessError.USER_LOGIN_FAIL); } UserPasswordDO userPasswordDO = userPasswordDOMapper.selectByUserId(userDO.getId()); UserModel userModel = convertFromDataObject(userDO, userPasswordDO); if (!StringUtils.equals(encrptPassword,userModel.getEncrptPassword())) { throw new BusinessException(EmBusinessError.USER_LOGIN_FAIL); } return userModel; }
注意,完成方法的时候需要在框架的xml文件中写出selectByTelphone
1 2 3 4 5 6 7 8 9 10 11 <select id ="selectByTelphone" resultMap ="BaseResultMap" > select <include refid ="Base_Column_List" /> from user_info where telphone = #{telphone,jdbcType=CARCHAR} </select >
然后要在对应的UserDOMapper中加上这个方法:
1 UserDO selectByTelphone (String telphone) ;
完成登录验证方法后再完成登录的方法。
一般的初级登录凭证为类似Token之类的东西,而不使用用户的session。后面我们会用到使用分布式会话session的机制,去解决分布式环境下用户登录的问题,但是现在我们先假设用户是单点session登录。
在验证方法中,返回UserModel,当用户登录成功后,将userModel返回给controller层。
1 2 3 4 5 6 7 8 9 10 11 12 13 14 15 16 17 18 19 20 @RequestMapping (value = "/login" ,method = {RequestMethod.POST},consumes = {CONTENT_TYPE_FORMED})@ResponseBody public CommonReturnType login (@RequestParam(name = "telphone" ) String telphone, @RequestParam (name = "password" ) String password) throws BusinessException, UnsupportedEncodingException, NoSuchAlgorithmException { if (org.apache.commons.lang3.StringUtils.isEmpty(telphone) || StringUtils.isEmpty(password)) { throw new BusinessException(EmBusinessError.PARAMETER_VALIDATION_ERROR); } UserModel userModel = userService.validateLogin(telphone,this .EncodeByMd5(password)); this .httpServletRequest.getSession().setAttribute("IS_LOGIN" ,true ); this .httpServletRequest.getSession().setAttribute("LOGIN_USER" ,userModel); return CommonReturnType.create(null ); }
解决登录后端,下面来写登录前端。
1 2 3 4 5 6 7 8 9 10 11 12 13 14 15 16 17 18 19 20 21 22 23 24 25 26 27 28 29 30 31 32 33 34 35 36 37 38 39 40 41 42 43 44 45 46 47 48 49 50 51 52 53 54 55 56 57 58 59 60 61 62 63 64 65 66 67 68 69 70 71 72 73 74 75 76 77 78 79 80 <body class "login" > <div class "content" > <h3 class "form-title" >用户登陆</h3> <div class="form-group"> <label class="control-label">手机号</ label> <div> <input class "form-control" type="text" placeholder="手机号" name="telphone" id="telphone" /> </div> </ div> <div class "form-group" > <label class "control-label" >密码</label> <div> <input class="form-control" type="password" placeholder="密码" name="password" id="password"/ > </div> </ div> <div class "form-actions" > <button class "btn blue" id="login" type="submit" > 登陆 </button> <button class="btn green" id="register" type="submit"> 注册 </ button> </div> </ div> </body> <script> jQuery(document).ready(function(){ $("#register").on("click",function(){ window.location.href="getotp.html"; }); $("#login").on("click",function(){ var telphone = $("#telphone").val(); var password = $("#password").val(); if(telphone == null || telphone == ""){ alert("手机号不能为空"); return false; } if(password == null || password == ""){ alert("密码不能为空"); return false; } $.ajax({ type:"POST", contentType:"application/ x-www-form-urlencoded", url:" http: data:{ "telphone" :$("#telphone" ).val(), "password" :password }, xhrFields:{withCredentials :true }, success:function (data ) if (data.status == "success" ){ alert("登陆成功" ); window .location.href="listitem.html" ; }else { alert("登陆失败,原因为" +data.data.errMsg); } }, error:function (data ) alert("登陆失败,原因为" +data.responseText); } }); return false ; }); }); </script>
测试,可以实现登录功能。
优化校验规则 之前完成了基本开发,但是对于企业级应用,这个代码还有不足。
对于注册,我们完成了初步的判空的提示:
1 2 3 4 5 6 7 8 9 if (userModel == null ) { throw new BusinessException(EmBusinessError.PARAMETER_VALIDATION_ERROR); } if (StringUtils.isEmpty(userModel.getName()) || userModel.getGender() == null || userModel.getAge() == null || StringUtils.isEmpty(userModel.getTelphone())) { throw new BusinessException(EmBusinessError.PARAMETER_VALIDATION_ERROR); }
但是比如对于age,除了不为空,还有范围的界定,等等。所以我们还需要别的方式来进行一些优化。
导入jar包:
1 2 3 4 5 <dependency > <groupId > org.hibernate</groupId > <artifactId > hibernate-validator</artifactId > <version > 5.2.4.Final</version > </dependency >
创建一个validator包,里面新建一个VlidationResult类,为验证后的结果。
1 2 3 4 5 6 7 8 9 10 11 12 13 14 15 16 17 18 19 20 21 22 23 24 25 26 27 28 29 30 public class ValidationResult private boolean hasErrors; private Map<String,String> errorMsgMap; public boolean isHasErrors () return hasErrors; } public void setHasErrors (boolean hasErrors) this .hasErrors = hasErrors; } public Map<String, String> getErrorMsgMap () return errorMsgMap; } public void setErrorMsgMap (Map<String, String> errorMsgMap) this .errorMsgMap = errorMsgMap; } public String getErrMsg () return StringUtils.join(errorMsgMap.values().toArray(),"," ); } }
这个类完成了应用程序和validation之间的对接。
然后实现这个Validator的具体操作
1 2 3 4 5 6 7 8 9 10 11 12 13 14 15 16 17 18 19 20 21 22 23 24 25 26 27 28 29 @Component public class ValidatorImpl implements InitializingBean private Validator validator; public ValidationResult validate (Object bean) final ValidationResult result = new ValidationResult(); Set<ConstraintViolation<Object>> constraintViolationSet = validator.validate(bean); if (constraintViolationSet.size() > 0 ) { result.setHasErrors(true ); constraintViolationSet.forEach(constraintViolation -> { String errMsg = constraintViolation.getMessage(); String propertyName = constraintViolation.getPropertyPath().toString(); result.getErrorMsgMap().put(propertyName,errMsg); }); } return result; } @Override public void afterPropertiesSet () throws Exception this .validator = Validation.buildDefaultValidatorFactory().getValidator(); } }
创建了一个新的Bean。
对UserModel中的一些属性加上约束:
1 2 3 4 5 6 7 8 9 10 11 12 13 14 15 16 17 18 @NotBlank (message = "用户名不能为空" )private String name;@NotBlank (message = "性别不能为空" )private Byte gender;@NotBlank (message = "年龄不能为空" )@Min (value = 0 ,message = "年龄必须大于0岁" )@Max (value = 150 ,message = "年龄必须小于150岁" )private Integer age;@NotBlank (message = "手机号不能为空" )private String telphone;private String registerMode;private String thirdPartyId;@NotBlank (message = "密码不能为空" )private String encrptPassword;
接下来在UserServiceImpl中引入这个新定义的Bean:
1 2 @Autowired private ValidatorImpl validator;
然后注释掉原来的方法,将新方法使用起来:
1 2 3 4 5 6 7 8 9 10 ValidationResult result = validator.validate(userModel); if (result.isHasErrors()) { throw new BusinessException(EmBusinessError.PARAMETER_VALIDATION_ERROR,result.getErrMsg()); }
然后当用户注册的时候,输入的属性值有了限制。
商品模块开发 商品模型模型——商品创建 商品模型模型——商品列表 商品模型模型——商品列表页面 商品模型模型——商品详情页面 交易模块开发 交易模型管理——交易模型创建 交易模型管理——交易下单 秒杀模块开发 秒杀模型管理——活动模型创建 秒杀模型管理——活动模型与商品模型结合